 Are you taking on a worker who’s not an employee? QuickBooks Online includes tools for tracking and paying independent contractors.
The COVID-19 pandemic created millions of self-employed individuals and small businesses. Whether they chose to, or circumstances forced them to, these new entrepreneurs had to learn new ways to get paid and to prepare their income taxes.
If you’re thinking about taking on a contract worker, you, too, will have to educate yourself on the paperwork and processes required to comply with the IRS’ rules for his or her compensation. It’s much easier than hiring a full-time employee, but it still takes some knowledge of how QuickBooks Online handles these individuals.
You’ll also need to make certain that the person you’re hiring is indeed an independent contractor and not an employee. The IRS takes this distinction very seriously. If you’re at all unsure of your new hire’s employment status, we can help you sort it out.
Creating Records for Contractors
Once new contractors have accepted your offer, you’ll need to have then fill out an IRS Form W-9. You can download a copy here. Employees complete the more detailed Form W-4 so that the employer can withhold income taxes correctly, but you won’t have to withhold taxes for your contract workers. They will be responsible for calculating and paying quarterly estimated taxes and filing an IRS Form 1040 every year.
You, though, will be responsible for sending them an IRS Form 1099-NEC (Non-Employee Compensation) every January if you paid them more than $600 during the previous year. You do not need to send a 1099-NEC to a corporation or to an LLC that is treated as a C Corp or an S Corp.

You can complete the Vendor Information window for each independent contractor, checking the box in front of Track payments for 1099.
Using the information the contractors provide, you can create records for them in QuickBooks Online. If you don’t have a QuickBooks Payroll subscription, you can set them up as 1099 vendors. Click the Expenses tab in the toolbar and then on the Vendors tab. Click New vendor in the upper right to open the Vendor Information window. Complete the fields for the worker and be sure to check the box in front of Track payments for 1099, as shown in the partial image above.
The vendor records you create will appear in QuickBooks Online’s Vendors list (again, Expenses | Vendors). Click on one to open it. You can toggle between two tabs here. The first, Transaction List, will eventually display all your financial dealings with that contractor. Vendor Details opens the record you just created, which you can edit from this screen.
Paying Contractors
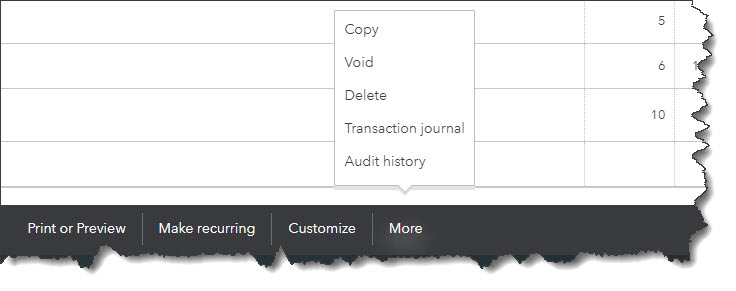
When independent contractors send you invoices, you’ll return to this same screen. There are three ways you can pay them. Click the down arrow next to New Transaction in the upper right corner to see your options (or look down at the end of the row while you’re in list view). You can record the debt as a Bill if you want to pay it later (or if that’s the way you structure your recordkeeping). If you’re paying it right away, you can create an Expense or write a Check.

You can choose an option from this vendor action menu to pay your independent contractors.
When you click one of these, QuickBooks Online opens a form with many of the contractors’ details already filled in. You’ll need to complete any additional fields at the top of the screen, and then either record the payment or debt under Category details or Item details, depending on how you do your bookkeeping. Either way, you’ll be able to enter the quantity and rate and/or amount and mark it billable (with a markup percentage, if you’d like) to a customer or project.
You’re probably going to want our help here, since there’s more than one way to pay independent contractors. If you subscribe to QuickBooks Payroll, you can use the service’s contractor features, which include the ability to invite your contractors to fill out their own records in QuickBooks Online. You may also want to add an account to your Chart of Accounts, and we’d want to offer guidance there. And you need to ensure that you’re classifying payments correctly, so they’ll appear in 1099 reports and 1099s themselves.
Creating records for independent contractors and paying these individuals seem like they should be simple operations. But anytime you’re dealing with payroll issues, you’re dealing with peoples’ livelihoods – and the IRS. We strongly encourage you to let us help you get this right. Contact us, and we’ll make sure you’re handling your worker payments with absolute accuracy.
 With gas prices so high, you need to track your travel costs as closely as possible. Consider getting a tax deduction for your business mileage.


 Cash is critical to the functioning of every business. Maintaining a healthy cash flow not only allows a company to meet its financial obligations but also gives it the flexibility to take advantage of emerging opportunities.
 Your customers are your company’s lifeblood. Make sure their records are thorough and up-to-date.
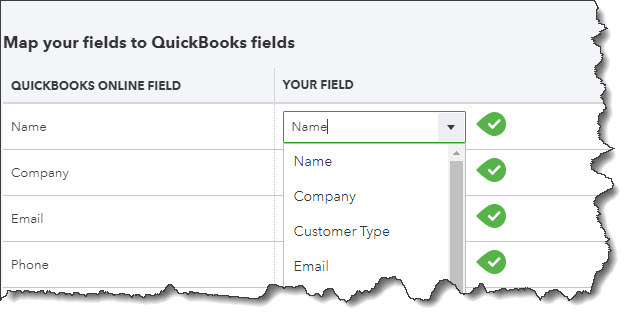
 Expand QuickBooks Online’s Features: Use Integrated Apps

 There are always more things to learn about the applications we use every day. Here are some tips for expanding your use of QuickBooks Online.