• Skip to content
  • Skip to primary sidebar

Header Right

  • Home
  • About
  • Contact

Don’t Wait Until December: Year-End Tax Actions You Should Take Now

November 20, 2021 by admin

side profile of a businesswoman using a laptopUnless you’ve been planning for 2021 taxes all year, it’s time to take actions that can reduce your IRS obligation.

We’ve talked before about the importance of planning for taxes year-round. If you haven’t been able to do that because 2021 has been another complicated year, it’s not too late. There are things you can still do in November and December that will have impact on this year’s taxes.

It may be that taxes are not as big an issue for you because the COVID pandemic reduced your household income or your business sales, so you assume you’ll pay less in taxes. If so, you’re not alone. The Fidelity Investments 2021 Financial Resolutions Study found that two-thirds of Americans experienced a financial setback in 2020, for a variety of reasons, and 38 percent predicted that they’d be in survival mode in 2021.

Whether you’ve just been hanging on for the last ten months or 2021 was a good year for you, taking actions now that will affect your financial obligation that will come due next April should be high on your to-do list. Here are some suggestions.

Take advantage of Section 179.

No one likes dealing with depreciation. If you purchase or finance qualifying equipment or software in 2021, you may not have to. Section 179 in the IRS code allows you to write off the entire purchase price for the current tax year, up to $1,050,000. Though larger businesses may benefit from it, this tax legislation was specifically designed to help small businesses invest in themselves.

tax tips

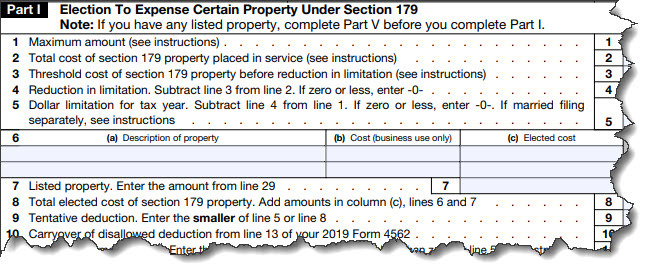
You’ll complete IRS Form 4562 to take the Section 179 deduction.

This doesn’t mean that you can only take the deduction if you buy equipment that costs less than $1,050,000. But the benefits start to diminish when you spend more than $2,620,000 total. The IRS also requires that you begin using the equipment—used or new—in 2021 to take the deduction.

Questions about whether you can take this deduction? Contact us.

Inventory your inventory.

Now is a good time to take a close look at your inventory. Are there products that are doing well? You might buy more before the year ends so you can claim a business expense. On the other hand, is there inventory that hasn’t sold and is unlikely to? If you have items that have lost their value, they can have impact on the balance sheet and income statement. Best to write them off.

This involves some complex calculations and knowledge of accounting rules. We can help you sort this out.

Consider putting off some income.

Are you due a bonus? You might consider putting that off until next year if your company allows it. Of course, you don’t yet know what your income and expenses will be for 2022. But at least you’ll be able to start including that as income at the beginning of the year and you’ll have plenty of time to make plans to offset it.

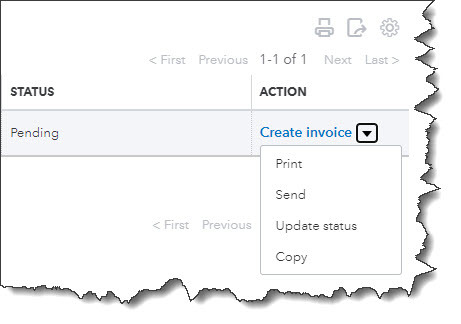
If you’re a freelancer or independent contractor and you know that your income will far outweigh your expenses in 2021, you might wait until the end of December to send out some invoices. That way, they won’t be included in 2021 income.

Look for more deductions.

tax tips

How well do you know the Schedule C and all of the business expenses you can claim? We can help you minimize your tax obligation.

It’s better to think about this now instead of during tax preparation, so you can assemble any documentation needed and have it handy. You already know about commonly-claimed deductions like hardware and software costs, internet and phone connections, and office rent and utilities. Are you considering your home office space, as long as it’s devoted to business use? Legal and professional fees? Bank fees and business interest? Advertising and promotions? Business insurance?

Then there are charitable contributions to qualifying organizations, which must be made by December 31, 2021, to be deductible for this tax year. Single filers who do not itemize can claim up to $300 in donations, while married couples filing jointly can take up to a $600 deduction. Individuals who do itemize can give up to 100 percent of their adjusted gross income (AGI) and claim it on their tax returns. C Corporations are limited to cash donations equaling up to 25 percent of taxable income.

Put more money in your retirement accounts.

This, of course, benefits you in two ways. Your retirement will be better funded the more you contribute to your 401(k)s, IRAs. etc. You’ll also benefit from a tax break by maxing out your contributions.

“Bunch” deductions.

When you bunch deductions, you claim as many deductions as you can in a given tax year so you can itemize. You take a standard deduction the next year, then continue to alternate between the two. This is often done with charitable donations that you make at the beginning and end of the year, but it can work with deductions like medical expenses and property taxes.

Use Our Services

You may have heard some of these suggestions before and either didn’t think they would help you or weren’t sure how to use then in your tax preparation. But your goal should be to pay as little tax as is legally possible. We can help you with this. If you want to have a conversation about any of the ideas mentioned here before the end of the year, contact us. We’ll also be available to consult with you and prepare your taxes next year. Let us know now if you’d like to do that so we can get you on the schedule.

Filed Under: QuickBooks

Customers Paying Late? How to Create Statements

October 20, 2021 by admin

There are many ways to encourage delinquent customers to pay. QuickBooks Online’s statements may be effective for you.

After the year-plus you’ve just experienced, the last thing your small business needs is customers who are behind on their payments to you. You may have been giving them a break because you know that they’re struggling, too, but things have been looking up for many companies in the past few months. It’s time for you to be more proactive about calling in your debts.

There are numerous ways you can accomplish this. One of the best is to send statements in QuickBooks Online, which are detailed reminder forms that contain multiple transactions. These can be especially helpful if you’ve sent multiple invoices with no response. There are three different types you can send, depending on your needs. Here’s how you create them.

Before You Start

QuickBooks Online offers a couple of options for formatting your statements. To see these, click the gear icon in the upper right corner and select Your Company | Account and Settings. Click the Sales tab and scroll down to the Statements section. Click the pencil icon over to the far right to make any changes needed. You can:

  • List each transaction as a single line or include all of the detail lines.
  • Display an aging table at the bottom of each statement.

Click the buttons to specify your preference and then click Save and Done.

tax tips

QuickBooks Online gives you control over some elements of your statements.

Three Statement Types

You can choose from among three different types of statements in QuickBooks Online: Balance Forward includes invoices with outstanding balances for a specified range of dates. Open Item statements contain information about all unpaid (open) invoices from the last 365 days. And Transaction Statements show every transaction in a date range that you specify. We’ll describe how to create them so you can decide which makes the most sense for a particular situation.

One Way to Create Statements

Like it does for many other actions, QuickBooks Online offers two ways to create statements. The first is easier. Click the New button in the upper left and select Statement (under Other). Click the down arrow in the field under Statement Type to see the three options there.

If you select Balance Forward, you’ll need to define three criteria (there will be similar options for the other two types):<.p>

  • Statement Date
  • Customer Balance Status (Open, Overdue, or All)
  • Start Date and End Date

tax tips

QuickBooks Online makes it easy to create any of three types of customer statements.

When you’re satisfied with your statement parameters, click Apply. QuickBooks Online will display a list of the transactions that meet your criteria, along with the number of them that will be generated. Each row in the list will display the recipient’s name, email address, and balance. In the upper right corner, you’ll see the number of statements again and the total balance these customers represent.

If you want to exclude any of these customers, click in the box in front of each to unselect them and delete the checkmark. When you’re satisfied with your list, click Save, Save and send, or Save and close. If you click Save and send, a window will open containing a preview of your statements. Thumbnails of each will appear in the left pane. Click on any to see their previews. When you’re ready, you can download, print, or send them.

If you click Save or Save and close, you’ll still be able to see the statements you’ve just generated. Click the Sales tab in the toolbar, then All Sales. Click the down arrow next to Filter and open the drop-down list under Type. Select Statements, and your list will appear. You can print or send one by selecting the correct option in the Action column. If you want to dispatch multiple statements, click in the box in front of each, and then click the down arrow next to Batch actions.

Another Method

There’s an alternate way to create statements. Click the Sales tab in the toolbar, then Customers. Select any or all of the customers in the list, then click the down arrow next to Batch actions and select Create statements. QuickBooks Online will open the Create Statements window again so you can select the type and process your statements like you did using the previous method.

We don’t expect that you’ll have much trouble working with statements, though you may want to consult with us on when they’re appropriate. We can also suggest other ways to bring your accounts receivable up to date. As always, we’re available to help you maximize and streamline your use of QuickBooks Online. Keeping your financial books current and organized is one way to ensure that you don’t fall too far behind with customer payments.

Filed Under: QuickBooks

How Does Progress Invoicing Work in QuickBooks Online?

September 20, 2021 by admin

Want to break up an estimate into multiple invoices? QuickBooks Online supports progress invoicing.

If you do large, multi-part projects for customers, you may not want to wait until absolutely everything is done before you send an invoice. This can be especially problematic when you have to purchase a lot of materials for a job that will eventually be billed to the customers.

QuickBooks Online has a solution for this: progress invoicing. Once you’ve had an estimate approved, you can split it into as many pieces as you need, sending partial invoices to your customer for products and services as you provide them, rather than waiting until the project is complete. If cash flow is a problem for you, this can be a very effective solution. You might be able to take on work that you otherwise couldn’t because you’ll be getting paid periodically.

Setup Required

Progress invoicing requires some special setup steps. First, you’ll need to see whether QuickBooks Online is prepared for the task. Click the gear icon in the upper right and select Account and settings under Your Company. Click the Sales tab and scroll down to Progress Invoicing. It may just say On to the right of Create multiple partial invoices from a single estimate. If it doesn’t, click the pencil icon to the right and turn it on. Then click Save and Done.

You’ll also have to choose a different template than the one you use for standard invoices. Click the gear icon and select Custom form styles. Click New style in the upper right and then click Invoice. Enter a new name for the template to replace My INVOICE Template, like Progress Invoice. Then click Dive in with a template or Change up the template under the Design tab. Select Airy new by clicking on it. This is the only template you can use for progress invoicing.

Now, click on Edit print settings (or When in doubt, print it out). Make sure there’s no checkmark in the box in front of Fit printed form with pay stub in window envelope or Fit to window envelope. Then click on the Content tab. You’ll see a preview of the template (grayed out) to the right. Click the pencil icon in the middle section. Select the Show more activity options link at the bottom of the screen.

If you want to Group activity by (Day, Week, Month, or Type), check that box and select your preference. Go through the other options here and check or uncheck the boxes to meet your needs. Then click Done. You’ll see your new template in the list of Custom form styles.

QuickBooks Online allows you to designate one form style as the default. This is the form that will open when you create a new invoice or estimate template. If you plan to send a lot of progress invoices, you might want to make that the default. To do this, find your new template in the list on this page and click the down arrow next to Edit in the Action column. Click Make default. If you leave your standard invoice as the default, you can always switch when you’re creating an invoice by clicking the Customize button at the bottom of the screen.

Creating a Progress Invoice

Invoice and estimate forms in QuickBooks Online are very similar. The only major difference is that estimates contain a field for Expiration date. To start the process of progress invoicing, select an estimate that you want to bill that way. Click the Sales tab and select All Sales. Find your estimate and click on Create invoice in the Action column. A window like the one in the above image will appear.

You can bill a percentage of each line item or enter a custom amount for each line. If you choose the latter, the invoice that opens will have zeroes in the Due column. You can alter the amount due for any of these by either a percentage or an amount and/or leave them at zero if you don’t want to bill a particular product or service. Either way, the Balance due will reflect your changes. When you’ve come to the last invoice for the project, you’ll check Remaining total of all lines.

Once you’ve chosen one of these options, click Create invoice. Double-check the form and then save it. You can now treat it as any other invoice. To see a list of your progress invoices, run the Estimates & Progress Invoicing Summary by Customer report.

As you can see, there are numerous steps involved in creating progress invoices. Each has to be done with precision, so the customer is billed the exact total amount due at the end. We can help you accomplish this. We’re also available to help with any other QuickBooks Online issues you have. Contact us to set up a consultation.

Filed Under: QuickBooks

The Life of an Estimate in QuickBooks Online

August 16, 2021 by admin

Smiling businesswoman at meetingEstimates—or quotes, or bids—are useful tools when you’re pitching a sale of products or services. Here’s how QuickBooks Online handles them.

Sales estimates are standard procedure in many professions. You wouldn’t authorize a car repair without one. Nor would you OK a remodeling job on your kitchen or a summer’s worth of yard landscaping without knowing what the costs will be upfront.

Estimates don’t have to be formal documents. You could scribble a proposal for products or services and their prices on a paper napkin and have your customer sign it. But as we’ve said before, the quality of your sales documents reflects on your company’s professionalism as well as its image.

QuickBooks Online offers specialized tools to manage this step in the selling process. You can create detailed estimates that the site can easily convert to invoices when you get an approval. And QuickBooks Online reports help you monitor the progress of your quotes. Here’s how it works.

A Dedicated Form

You probably already know how to create an invoice. If so, you shouldn’t have any trouble generating estimates because the forms are very similar. To get started, click the + (plus) sign in the upper right corner of the screen. In the Customers column, click Estimates. A form like this will open:


QuickBooks Online provides a form template for your estimates.

Open the drop-down list in the Customer field and select the correct one (or +Add new).

Note: If you click on +Add new, you’re only required to enter your prospective customer’s name to create an estimate; contact detail, of course, will not appear on the form. You can go back later and complete a customer record, but it’s best to at least enter a physical and email address. Click +Details to open the complete record, then save what you provide there.

The word “Pending” should appear below the Customer field. This refers to the status of your estimate. Click the down arrow to the right of it, then on the down arrow in the small window that opens to see what options you’ll have later. If you want to copy someone else on the estimate, click the small Cc/Bcc link to the right and provide the email address(es).

Enter (or select by clicking on the calendar graphic) the Estimate date. If your offer is only good for a limited period of time, enter an Expiration date; otherwise, leave that field blank. Then go down to the Product/Service grid and select the items for which you’re providing an estimate, one on each line. Fill in the Qty field and check the labeled box if the item is taxable.

If you had created a product record for it already, the other fields should be completed automatically. If not, click +Add new. The Product/Service information pane should slide out from the right side of the screen. Here again, you’re only required to enter a Name, but you should really create the whole record and save it to return to the estimate. If you’ve not been through this process before, we can walk you through it.

You can add a discount to the estimate as either a percentage or a dollar amount in the lower right corner of the screen. You can also edit the customer message that appears in the lower left and attach any files necessary. When you’re done, save the estimate.

Estimate Options


You can work with your estimate from the Sales Transactions screen.

If you’re not already there, click the Sales link in the left vertical toolbar, and then the All Sales tab and the Estimates bar. Find your estimate and look at the end of the row, in the Action column. If you want to convert your estimate to an invoice, click Create invoice. In the window that opens, indicate whether you want to invoice:

  • A percentage of each line item,
  • A custom amount for each line, or,
  • The total of all lines.

Look over your invoice when it opens, complete any other fields necessary, and save it. Your estimate’s status has now been changed to Closed, and the new invoice created from it will appear on the Sales Transactions screen. It will also be included in the Estimates By Customer report.

If you can create an invoice, you can create an estimate. The tricky part comes in when you have to amend an estimate before you bill it – or even alter it and resubmit it. If you’re going to be working with estimates extensively, let us help you get it right from the start.

BookPro offers QuickBooks consulting as part of our package of accounting services for small businesses. Call us at 407-281-7375 or request your free consultation online now and find out how you can leverage QuickBooks to precisely track your finances.

Filed Under: QuickBooks

How to Create Estimates in QuickBooks Online

July 21, 2021 by admin

businessman workingWhether you sell products or services, you may need to create estimates in QuickBooks Online. Here’s how it’s done.

It would be nice if you could just instantly invoice every sale. But sometimes your customers need to know what a particular purchase will cost before they make the decision to buy. So you need to know how to create an estimate. If the sale goes through, you’ll of course want to send an invoice.

QuickBooks Online automates this entire process. It even helps you track the progress of your estimates by providing a special report. Here’s how it works.

Just Like An Invoice – Almost

The process of creating an estimate in QuickBooks Online is almost identical to creating an invoice. You click the New button in the upper left and select Estimate.

QuickBooks tips

Creating an estimate in QuickBooks Online is like creating an invoice, with a few differences.

When the form opens, you’ll notice one difference right away. Directly below the Customer field, you’ll see the word Pending next to a small down arrow. Click it to see what your options are here. You’ll be able to update its status later. Select a Customer to get started. If this is a new customer, click + Add New and enter at least the name. If you want to build a more complete profile at this point, click Details and complete the fields in the window that opens. To send a carbon copy or blind copy of the estimate to someone else, click the Cc/Bcc link.

Next to the Estimate date, there’s a field for Expiration date. Enter that and continue on to add the products and/or services that will be included, just as you would on an invoice. If you’re generating an estimate for a new product or service, click + Add new in the drop-down list. A panel will slide out from the right that allows you to create one.

You’ll see more options for your estimate at the bottom of the page. You can add a message in the message box (or leave the default message if there is one). You can also Customize it, Make recurring, or Print or Preview it. When you’re satisfied, Save it, and send it to the customer.

QuickBooks tips

You can preview your estimate to see what the customer will see before saving it.

Updating the Status

Your estimate will not be considered a transaction until you accept it. To do this, click the Sales link in the toolbar, then All Sales. Find your estimate in the list by looking in the Type column. Click the down arow next to Create invoice to see your other options there. You’ll see that you can Print or Send it or save a Copy.

Click Update status. In the window that opens, click the down arow next to Pending. From the list that drops down, select Accepted. You can also mark it Closed or Rejected. If you choose any of the last three options, another window opens that allows you to enter the name of the individual who authorized the action and the date it was done.

Click Create invoice if your estimate was accepted. You’ll have three options here. You can invoice your customer for:

  • The estimate total.
  • A percentage of each line item.
  • A custom amount for each line.

QuickBooks tips

When you locate your estimate on the Sales Transactions page, you’ll have several options for managing it.

After you’ve made your selection, click Create invoice to open the form with the amounts filled in based on your preference. Complete anything that’s unfinished but do not change any of the product or service line items. Save it, and your invoice is ready to go. You can always check the status of your estimates by running the Estimates by Customer report.

Creating and tracking estimates is as easy as working with invoices. You may run into difficulties, though, if you need to do anything beyond that point with estimates, such as modifying it and re-submitting them. We’re here to answer any questions you might have about this. It’s important that you get your estimates and their subsequent invoices exactly right, so you don’t lose money or sales. Let us know if you want to go over these concepts.

BookPro offers QuickBooks consulting as part of our package of accounting services for small businesses. Call us at 407-281-7375 or request your free consultation online now and find out how you can leverage QuickBooks to precisely track your finances.

Filed Under: QuickBooks

How Does QuickBooks Online Handle Mobile Expenses?

June 24, 2021 by admin

side profile of a businesswoman using a laptopIf you purchase several items and services away from the office, QuickBooks Online can help you record them while you’re out and about.

QuickBooks Online’s mobile app, available at the Apple App Store and Google Play, can do many of the same tasks that it performs on your office desktop. You can, for example:

  • Check account balances.
  • Add and edit estimates, invoices, and sales receipts.
  • Add and edit customers, vendors, products, and services.
  • Record invoice payments.

One of the most common uses of the app, though, is the recording of expenses. Rather than coming home from a trip with your briefcase stuffed full of receipts and notes about purchases you made, you can document them on the road using your mobile device. When you get back to the office and log on to QuickBooks Online, they’ll all be there.

How It Works


You can snap a photo of a receipt with your smartphone and attach it to an expense you record in QuickBooks Online’s mobile app.

Open your QuickBooks Online mobile app and click the plus (+) sign at the bottom, then tap the Expense icon. The New Expense screen will open. If you have a paper receipt, lay it flat on a table in a well-lighted area. Click the camera icon and then the Take Photo link. If you took the picture outside of QuickBooks Online for some reason, you’d select the Choose Existing link. Your device’s camera will open, and you’ll see four squared corners on the edges of the screen.

Hover your device over the receipt. You’ll need to position the camera so the receipt area that you want captured appears within the four corners. QuickBooks Online will provide advice along the way to help you do this. When you’re in the right place, you’ll see the phrase, Great! Snap the pic. Click the shutter icon below, and your device will snap the photo and display it. If you want to use it, click Use this photo (if you want to try again, click the X in the upper left of the screen).

QuickBooks Online will open the New Expense screen. You’ll see a miniature version of your receipt in the upper left corner. Looking at your original version—it will be too small to see here—fill in the blanks with the data from the purchase. Be sure to click the Billable button if you can bill someone else for it. Make any notes you’ll need in order to remind yourself of the transaction, and Add a Split if you need to divide the transaction between categories, customers or vendors, or billable status. Click Save when you’re done.

Automatic Synchronization


Once you’ve entered an expense in QuickBooks Online’s mobile app, it will be synchronized with your desktop, browser-based version.

Of course, no duplicate data entry is required once you’ve entered a receipt in the QuickBooks Online mobile app – the two versions always update each other.

Once you’re back at your desktop, on the browser-based version of QuickBooks Online, click Expenses in the toolbar to open the Expense Transactions screen. You should see the transaction you just created on your mobile device first in line on the list that displays. Click View/Edit at the end of that line to see it. Look toward the bottom under Item Details to see the link to an attachment that contains the photo you snapped of the receipt.


The record of the expense you entered on your mobile device will contain a link to an attachment that contains the photo of your receipt.

Of course, you don’t have to take a picture of your receipt with your mobile device. You can simply enter the details of your expense and Save the record.

QuickBooks Online’s mobile app can help you save time and improve the accuracy of your work done away from the office. As we mentioned earlier, the app is capable of doing much more than simply recording receipts. We’d be happy to run you through its pieces to make sure your remote accounting work is done correctly.

BookPro offers QuickBooks consulting as part of our package of accounting services for small businesses. Call us at 407-281-7375 or request your free consultation online now and find out how you can leverage QuickBooks to precisely track your finances.

Filed Under: QuickBooks

  • « Previous Page
  • Page 1
  • Page 2
  • Page 3
  • Page 4
  • Page 5
  • …
  • Page 7
  • Next Page »

Primary Sidebar

Search

Archives

  • November 2022
  • October 2022
  • September 2022
  • August 2022
  • July 2022
  • June 2022
  • May 2022
  • April 2022
  • March 2022
  • February 2022
  • January 2022
  • December 2021
  • November 2021
  • October 2021
  • September 2021
  • August 2021
  • July 2021
  • June 2021
  • May 2021
  • April 2021
  • March 2021
  • February 2021
  • January 2021
  • December 2020
  • November 2020
  • October 2020
  • September 2020
  • August 2020
  • July 2020
  • June 2020
  • May 2020
  • April 2020
  • March 2020
  • February 2020
  • January 2020
  • December 2019
  • November 2019
  • October 2019
  • September 2019

Categories

  • Business Best Practices
  • Business Tax
  • Individual Tax
  • QuickBooks

Copyright © 2021 · https://www.bookpro-accounting.com/blog