• Skip to content
  • Skip to primary sidebar

Header Right

  • Home
  • About
  • Contact

QuickBooks

How to Create Product Records in QuickBooks Online

November 21, 2020 by admin

Businesswoman at deskWhether your company sells product or services, QuickBooks Online can help you track them.

If you sell one-of-a-kind products and can see all of them at a glance, tracking your inventory isn’t such a big issue. But not many people run businesses like that. Even if you do, you’d want to keep track of what you have and what you’ve sold for accounting purposes.

Most businesses sell multiple types of products and stock numerous units of them. These companies need to be able to easily add them to invoices and sales receipts. They need to know what’s selling and what’s not, and they need to know when it’s time to reorder.

QuickBooks Online’s recording and tracking tools meet all of these requirements by allowing you to create records for services. Here’s how it works.

Getting Ready

Before you can start working with QuickBooks Online’s product records, you should make sure that the site is set up for this purpose. Click the gear icon in the upper right, then Your Company | Account and settings. Click the Sales tab to get to the Products and services section, as pictured below.

QuickBooks tips

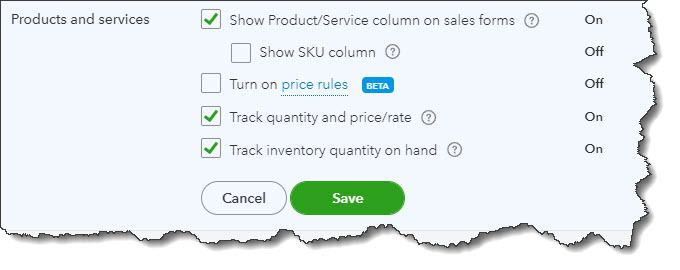
QuickBooks Online’s Account and Settings has a section devoted to Products and services.

Click on Products and services to open your options here. To turn any entry from On to Off, or vice versa, click in the box at the beginning of the line to check or uncheck it. To see an explanation of each, click on the small circled question mark. When you’re done here, click Save. Then click the X in the upper right to close this window.

Creating Records

To start entering product and service data in records, click the gear icon in the upper right, then select Products and services. Since you haven’t entered anything yet, the table will be blank. Eventually, it will contain data for each record you’ve created. You’ll also notice two colored circles at the top of the screen, one marked Low Stock and the other, Out of Stock. When there is a number next to either of them, you’ll be able to click on either circle to see a list of what’s low or what’s out.

Click New in the upper right. A vertical panel will slide out asking what kind of record you want to create. You can choose from:

  • Inventory – Physical items you sell whose quantity you want to track
  • Non-inventory – Products you buy or sell but whose quantities you don’t need to track
  • Service – Services you sell, like legal representation or landscaping
  • Bundle – A group of products and/or services that are sold together, like computer training and accompanying software

We’re going to create an inventory item, so click on Inventory. Type its Name in that field and add a photo if you’d like. If the product has been assigned a SKU, enter that in its field. You may want to divide your products into primary categories and sub-products or services (like Writing Instruments and Pens, Pencils, Markers, etc.). You can skip this option if you don’t.

QuickBooks tips

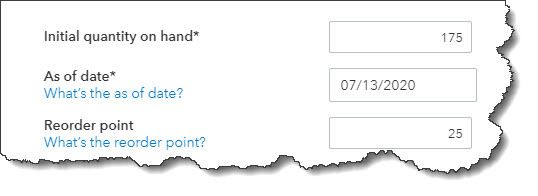
QuickBooks Online helps prevent product shortages.

In the next section, you’ll enter the Initial quantity on hand. How many do you have as of (current) date? And where do you want to set your Reorder point? What number of items remaining should trigger the Low Stock alert so you can replenish your supply?

Inventory asset account should already be set at Inventory Asset. Enter a brief Description and then the product’s Sales price/rate (the price you’ll charge customers) and leave Income account set at Sales of Product Income. Then select a Sales tax category. If you haven’t set up sales taxes in QuickBooks Online and believe you’re required to pay them on at least some sales, please let us help.

In the Purchasing information field, enter the description that should appear on purchase forms, then Cost (the price you paid to buy the product, if any). The Expense account should be Cost of Goods Sold. Select a Preferred Vendor if you’d like and Save the record.

Not all fields are required in your product and service records, but we strongly recommend you complete each record as thoroughly as is possible.

Next month, we’ll look at how product and service records are used in QuickBooks Online. In the meantime, please let us know if there’s any way we can help with your accounting or your use of QuickBooks Online. We know these are challenging times for you, and we hope you’ll use us as one of your resources.

SOCIAL MEDIA POSTS

Before you can start recording sales in QuickBooks Online, you’ll need to create product and/or service records. We can help with this and show you how.

Did you know QuickBooks Online’s settings need to be tweaked before you can use the site properly? Product records is one of these areas, and we show you here.

Did you know QuickBooks Online can warn you when it’s time to reorder products? Let us help you set up this important function.

If you haven’t explored your company’s sales tax requirements, we can show you how QuickBooks Online tracks this necessary information. Read more here to get started.

BookPro offers QuickBooks consulting as part of our package of accounting services for small businesses. Call us at 407-281-7375 or request your free consultation online now and find out how you can leverage QuickBooks to precisely track your finances.

Filed Under: QuickBooks

10 Tips for Better Budgeting…

October 25, 2020 by admin

Business team busy at work…and how QuickBooks Online can help you with the mechanics.

If you already have a budget, it’s probably been difficult for you to stick with it for the last several months. Unless you provide products and/or services that have been in great demand since the COVID-19 pandemic took hold, you’ve had to adjust your budget significantly.

Better days are ahead, though, and now is a good time to start doing some planning for 2021. While there are still likely to be uncertainties next year, creating a budget will give you a starting point. A budget increases your awareness of all of your projected income and expenses, which may make it less likely that you’ll find yourself constantly running short on funds.

Here are some ways you can make your budgeting process more effective and realistic.

Use what you already know. Unless you’re starting a brand-new business, you already have the best resource possible: a record of your past income and expenses. Use this as the basis for your projections.

Be aware of your sales cycle. Even if you’re not a seasonal business, you’ve probably learned that some months or quarters are better than others. Budget conservatively for the slower months.

Distinguish between essential and non-essential expenses. Enter your budget items for the bills and other expenses that must be covered before you add optional categories.

QuickBooks tips

You can use data from a previous year to create a new budget in QuickBooks Online.

Keep it simple. Don’t budget down to the last paper clip. You risk budget burnout, and your reports will be unwieldy.

Build in some backup funding. Just as you’re supposed to have an emergency fund in your personal life, try to create one for your business.

Make your employees part of the process. You shouldn’t be secretive about the expense element of your budget. Try to get input from staff in areas where they have knowledge.

Overestimate your expenses, a little. This can help prevent “borrowing” from one budget category to make up for a shortfall in another.

Consider using excess funds to pay down debt. Debt costs you money. The sooner you pay it off, the sooner you can use those payments for some non-essential items.

Look for areas where you can change vendors. As you’re creating your budget think carefully about each supplier of products and services. Can you find less costly alternatives?

Revisit your budget frequently. You should evaluate your progress at least once a month. In fact, you could even start by budgeting for only a couple of months at a time. You’ll learn a lot about your spending and sales patterns that you can use for future periods.

How QuickBooks Online Can Help

QuickBooks Online offers built-in tools to help you create a budget. Click the gear icon in the upper right corner and select Budgeting under Tools. Click Add budget. At the top of the screen, give your budget a Name and select the Fiscal Year it should cover from the drop-down list by that field. Choose an Interval (monthly, quarterly, or yearly) and indicate whether you want to Pre-fill data from an existing year.

QuickBooks tips

QuickBooks Online supplies a budget template that already contains commonly used small business items.

The final field is labeled Subdivide by, which is optional. You can set up budgets that only include selected Customers or Classes, for example. Select the desired divider in that field, then choose who or what you want included in the next. Click Next or Create Budget in the lower right corner (depending on whether you used pre-filled data) to open your budget template. If you subdivided the budget, you’ll see a field marked View budget for. Click the down arrow and select from the options listed there.

To create your budget, you simply enter numbers in the small boxes supplied. Columns are divided by months or quarters, depending on what you specified, and rows are labeled with budget items (Advertising, Gross Receipts, Legal & Professional Fees, etc.). You simply enter numbers in the boxes that apply. When you click in a box, a small arrow appears pointing right. Click on this, and your number will automatically appear in the rest of that row’s boxes. When you’re done, click Save in the lower right. You can edit your budget at any time.

QuickBooks Online provides two related reports. Budget Overview displays all of the data in your budget(s). Budget vs. Actuals shows you how you’re adhering to your budget.

We know creating a budget can be challenging, but it’s so important – especially right now. We’d be happy to look at your company’s financial situation and see how QuickBooks’ budgeting tools—and its other accounting features—can help you get a better understanding of your finances.

SOCIAL MEDIA POSTS

Don’t have a budget set for your business? QuickBooks Online has tools that can simplify the process of creating one.

When you’re creating a budget, it’s helpful to distinguish between essential and non-essential expenses. QuickBooks Online has tools that can help you, including budgeting for necessities first.

When was the last time you shopped for new suppliers? Now is a good time to see if you could save some money and help with your budget. QuickBooks Online has many tools that can help both you and your business budget.

Did you know QuickBooks Online allows you to use existing income and expense data to create a budget? Here is how this is done.

Get back to the job of running your business and leave the accounting to us! Call us at 407-281-7375 now and request a free consultation to find out how we can work together for your success.

Filed Under: QuickBooks

5 Things You Need to Know About Sales Taxes in QuickBooks Online

August 20, 2020 by admin

Businessman And Businesswomen Having Informal Meeting In OfficeThe most important thing you need to know about sales tax is that administering it correctly can be challenging.

If you sold only one type of product to customers in one city, collecting and paying sales tax would be easy. But most businesses have a wider reach than that.

QuickBooks Online offers tools that allow you to set up sales tax rates and include sales tax on sales forms. Further, it calculates how much you must pay to state and local taxing agencies.

This is one of the most complicated areas in QuickBooks Online because you may have to deal with numerous taxing agencies. If you’re not already working with sales taxes, we strongly recommend you let us help you get everything set up correctly from the start. Taxing agencies can audit your recordkeeping and you want to make sure it is set up correctly.

That said, here are five things we think you should know.

QuickBooks Online calculates sales tax rates based on:

  • Where you sell. Every state is different. If your business is located in Florida and you sell to a customer in Minnesota, you’ll be charging any sales tax levied by the state of Minnesota and possibly the city and county and other taxing authorities – if you have a connection, a “nexus” in that state (a physical location, active salesperson, etc.).
  • What you sell.
  • To whom you sell. Some customers (like nonprofit organizations) do not have to pay sales tax. You’ll need to edit their customer records to reflect this in QBO. Open a customer record and click the Edit link in the upper right. Click the Tax info tab and make sure there’s no checkmark in the box that says This customer is taxable. The Default tax code will be grayed out, and you can enter Exemption details in that field.

QuickBooks tips

Customer records for exempt organizations should contain details for that exemption. You’ll need to see their exemption certificate or at least know its official number.

Intuit now offers a revamped version of QuickBooks Online’s sales tax features.

At some point, you’ll be asked if you want to switch to the new, more automated system. The actual mechanics of the process are simple, but you’ll be moving historical and in-process data to a new structure. If you have sales tax set up right now and your situation is at all complicated, you’re going to want our help with the transition.

This enhanced feature only supports accrual accounting.

You can combine individual tax rates.

If you are required to pay city, county, and state sales tax rates for a particular customer, for example, you can create a Combined tax rate that contains all of the individual components. The customer will only see the total on an invoice or sales receipt, but QuickBooks Online will track each one accordingly for payment and reporting purposes.

QuickBooks tips

You can combine sales tax rates in QuickBooks Online (image above from current Sales Tax Center in QuickBooks Online, not the enhanced one).

Product and service records should contain sales tax information.

This is another area that will require some research. Just as some services are subject to tax, some products are not (like groceries in Arizona). So, you’ll need to find out what the rules are for what you sell. You can find this information on the website of the state’s Department of Revenue (sometimes called the Department of Taxation).

Once you know, you can record that status in QuickBooks Online. Open a product record by going to Sales | Products and Services and clicking Edit in the Action column or create a new one by clicking New in the upper right. Scroll down to Sales tax category in the record. You can choose between Taxable – standard rate and Nontaxable.

There’s a third option here: special category. This gets complicated. We can help you determine whether it applies to you.

QuickBooks Online tracks the sales tax you owe.

You can see what you owe to each agency by running the Sales Tax Liability Report, and record payments when you’ve made them. Summary and detail versions of the Taxable Sales report are also available.

Once you get sales taxes set up in QuickBooks Online, it’s easy to add them to the relevant sales forms. Getting to that point, though, takes time, study, and careful attention to detail. If you’re getting ready to sell, or you’re already selling and struggling with sales taxes, let us know. We can schedule an initial consultation to see how we can be of assistance.

SOCIAL MEDIA POSTS

Did you know that QuickBooks Online can calculate and apply sales taxes to transactions? However, setup requires some upfront research. Here are a few things to get started.

Does your business have to charge multiple levels of sales taxes? QuickBooks Online allows you to combine them. Here’s how.

QuickBooks Online calculates sales taxes based on where and what you sell, and to whom. It’s a bit complicated and here is why. We can help you get through setup.

Did you know that Intuit has released an enhanced version of QuickBooks Online’s Sales Tax Center? Here are the details and we can help you make the transition

Get back to the job of running your business and leave the accounting to us! Call us at 407-281-7375 now and request a free consultation to find out how we can work together for your success.

Filed Under: QuickBooks

Resolve to Do These 3 Things in QuickBooks Online This Month

May 19, 2020 by admin

BookPro, Inc. ‘Tis the season for making resolutions and setting goals. Try exploring these three areas to dig deeper into QuickBooks Online.

By now, many New Year’s resolutions have already been made – and broken. Though they’re usually created with the best of intentions, they’re often just too ambitious to be realistic.

For example, you might decide to learn more about QuickBooks Online and keep up with your accounting chores more conscientiously in 2019. That’s hard to quantify. How will you know if you achieved that goal?

Instead, why not pick three (or more) specific areas and focus on them this month? We’ll get the ball rolling for you by making some suggestions.

Explore the QuickBooks Online mobile app:

Yes, QuickBooks Online itself is already mobile; you can access it from any computer that has an internet connection and browser. But you probably don’t always lug a laptop around when you’re away from the office, and you’re sometimes at locations where using it wouldn’t be practical. But you can always pull out your smartphone and fire up the QuickBooks online app, available for both iOS and Android.

No matter how small your smartphone (this image was captured on an iPhone SE), you can still do your accounting tasks using QuickBooks Online’s app.

QuickBooks Online’s app replicates a surprising percentage of the features found on the browser-based version. You can create, view, and edit invoices, estimates, and sales receipts for example, as well as see abbreviated customer and vendor records. Your product and service records are available there, including tools for recording expenses on the road.

Create a budget for one month:

Budgets are intimidating. That’s one reason why some small businesses don’t create them. So instead of trying to estimate what your income and expenses will be for an entire fiscal year, just build a budget for one month. In QuickBooks Online, you’d click the gear icon in the upper right, then select Budgeting. Click Add budget in the upper right to open the New Budget window.

Give it a name, like “February Budget,” and select FY2019. Leave the Interval at Monthly, and open the Pre-fill data? menu to click on Actual data – 2018 (if you have data from last year). Then click Create Budget in the lower right corner. Look at last year’s February numbers and estimate how they might change in 2019. Replace the old numbers with your new ones.

Creating a framework for a budget in QuickBooks Online is easy.

We’re suggesting you try it for just one month, so you get a feel for how this tool works. And that experiment will probably leave you with some questions. We can help you go further and complete an annual budget.

Customize your sales forms:

Every piece of paper and email you send to your customers contributes to their impression of you. Are you presenting an attractive, consistent image of your business to them? QuickBooks Online can help with this. It offers simple (for the most part) tools that allow you to modify the boilerplate forms offered on the site – without being an experienced graphic designer.

Start by clicking on the gear icon in the upper right and selecting Your Company | Custom Form Styles. Unless you’ve done some work in this area before, the screen that opens will have just one listed entry: your Master form, the one that comes standard in QuickBooks Online. To see what you can do, click Edit at the end of that line. Your four options are:

  • Design. This section contains links to modifications you can make to your sales forms’ visuals. You can, for example, add a logo or color and change the default fonts.

Want to change your logo or other elements of your sales forms? QuickBooks Online has the tools.

  • Content. Do you want to add or remove the standard columns (Date, Quantity, etc.) displayed on your invoices? You can do so by checking and unchecking boxes.
  • Emails. QuickBooks Online sends email messages with forms; you can edit them here.
  • Payments. This is a reminder that QuickBooks Online supports online payments, which can help you get paid faster.

There’s more you can do to make your sales forms look professional and polished. We can help you with these tools – and any others you want to explore to expand your use of QuickBooks Online. It’s a new year, and who knows what might come your way over the next 12 months? Contact us if you want to prepare for the new accounting challenges that 2019 might present.

Social media posts

Did you resolve to grow your understanding of QuickBooks Online in 2019? We can help you explore new features.

Go mobile in 2019: Download the QuickBooks Online app for your smartphone. You’d be surprised at how much it can do for you while you’re on the go.

How are things going with your 2019 budget? If you don’t have one yet, let us show you how QuickBooks Online simplifies this critical task.

QuickBooks Online’s sales forms (like invoices) may work fine for you. Do you know, though, how they can be customized to fit the image of your business? Ask us.

Filed Under: QuickBooks

Getting Started with Accounts in QuickBooks Online, Part 1

January 15, 2020 by admin

BookPro, Inc. - Your Bookseeping Professionals - QuickBooksQuickBooks Online was built to work with transactions downloaded from your online financial institutions. Here’s how to work with them.

The ability to import transactions from financial institutions into QuickBooks Online is definitely one of the best things about the site. You may have even signed up for that very reason. By now, you’ve probably already set up at least one connection. But are you using all of the QuickBooks Online’s account tools? There’s a lot you can do once you’ve imported in data from your bank or credit card provider.

We’ll explore these features in this column and the next.

First Steps

If you’re a new subscriber, you may not have established these critical links yet. It’s an easy process. Start by clicking the Banking link in the left vertical navigation pane. In the upper right corner, click Add Account and enter the name of your financial institution if it’s not pictured. Then follow the instructions you’re given on the screen. These can vary depending on the bank or credit card provider, but you’re always at least asked to enter the user name and password that you use to log into each online.

Need help with this? Let us know.

Viewing Your Transactions

Once you’ve made a successful connection, you’ll be returned to the Bank and Credit Cards page. You should see a card-shaped graphic at the top of the screen for each account you’ve linked. Click on one. The table that opens is not your account register. The view here defaults to For Review, which refers to transactions you’ve downloaded. The All tab should also be highlighted; we’ll get to Recognized transactions later.

When you first download transactions into QuickBooks Online, before you’ve done anything with them, many will appear under For Review.

There’s a lot going on here, so don’t be surprised if you’re confused. Review each transaction by clicking on it. QuickBooks Online will have guessed at how it should be categorized, but you can change this by opening the list in the category field and selecting the correct one. It’s critical that you get this right, since it will have an impact on reports and income taxes. If you need to Split it between multiple categories, click on that button found to the right. If the transaction is Billable, check that box and choose a customer from the drop-down list. If you don’t see this box, click the gear icon in the upper right and select Account and Settings | Expenses. Check to see that Make Expenses and Items Billable is turned On (click on Off, then check the appropriate box to turn it on).

Next, determine how you want to process the transaction by clicking on one of the three buttons at the top of the transaction box. Do you want to accept it and Add it to that account’s register? Do you want QuickBooks Online to Find (a) Match for it (like a payment that matches an invoice, for example)? Or, do you want to Transfer it to another account? Once you’ve made one of these three selections, the transactions that you’ve added or matched will move under the In QuickBooks tab (where you can still Undo them) and will be available in the account’s register.

Other Options

You can save time by using QuickBooks Online’s Batch Actions tool.

Say you run a cross some duplicate or personal transactions that you don’t want to appear in the current account’s register. Check the box in front of each, then click the arrow in the Batch Actions box. Select Exclude Selected. They’ll then be available under the Excluded tab. You can also Accept or Modify multiple transactions simultaneously by using this tool.

So far, you’ve been viewing All your transactions. Click on Recognized to the right of it. These are transactions that are already familiar to QuickBooks Online because they’ve appeared before and/or have been matched, or because you’ve created Bank Rules for them (we’ll address that concept next month). You’ll need to address these the same way you did the transactions in the For Review section; you can either Add or Transfer them.

If you’re new to QuickBooks Online, this may all sound pretty complicated. It can be at first. But once you’ve worked with downloaded transactions for a while, you’ll understand the flow much better. If you’re not clear on the process from the start, it can lead to trouble. Contact us at your convenience. We’d be happy to sit down with you and go through it all using your own company’s data; the familiarity may help.

Social media posts

If you’re new to QuickBooks Online, there’s a lot you need to understand about dealing with downloaded transactions out the gate. Let us help.

When you download transactions into QuickBooks Online, the site sometimes automatically “matches” them to existing entries. We’re here to explain and help you navigate this. Tired of reviewing downloaded transactions one by one in QuickBooks Online? Click on the Batch Actions button to explore this feature. We can show you how.

QuickBooks Online often guesses at how downloaded transactions should be categorized. You should always check these for accuracy, and we can show you how.

Call us at 407-281-7375 or request your free consultation online now and find out how you can leverage QuickBooks to precisely track your finances.

Filed Under: QuickBooks

  • « Previous Page
  • Page 1
  • Page 2
  • Page 3
  • Page 4

Primary Sidebar

Search

Archives

  • November 2022
  • October 2022
  • September 2022
  • August 2022
  • July 2022
  • June 2022
  • May 2022
  • April 2022
  • March 2022
  • February 2022
  • January 2022
  • December 2021
  • November 2021
  • October 2021
  • September 2021
  • August 2021
  • July 2021
  • June 2021
  • May 2021
  • April 2021
  • March 2021
  • February 2021
  • January 2021
  • December 2020
  • November 2020
  • October 2020
  • September 2020
  • August 2020
  • July 2020
  • June 2020
  • May 2020
  • April 2020
  • March 2020
  • February 2020
  • January 2020
  • December 2019
  • November 2019
  • October 2019
  • September 2019

Categories

  • Business Best Practices
  • Business Tax
  • Individual Tax
  • QuickBooks

Copyright © 2020 · https://www.bookpro-accounting.com/blog